Autodesk University is almost here! I am gearing up for a jam packed week of classes and events. My schedule is crazy this year. I am not sure when I will have a chance to rest, but it will be worth it (I think.)
I will be teaching 3 classes, and assisting as a lab assistant for 2 labs plus attending sessions on Revit and Construction.
Looking at the schedule, it appears that my nights will be just as busy... and I am not the party animal if you do not know me very well.
If you are an Alacad customer, I want to personally invite you to attend a special Customer Appreciation Mixer. Alacad wants to say Thank You for being our customer by hosting a mixer on Monday night at the V Bar from 7:00-8:00. Shoot me an email to ensure that you have your ticket to join us. You must have a ticket to attend.
I am looking forward to meeting many of you that are attending. Find me if you can in the sea of 10,000 attendees. See ya in Vegas!
Thursday, November 13, 2008
Friday, October 10, 2008
Enhancing Elevations in Revit
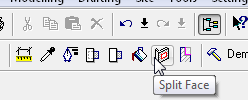
Creating elevations in Revit are as simple as placing a callout. Enhancing the elevations once they are created is another task. Tools like the Linework, Split Face, and Paint help us enhance the elevations. The Linework tool will allow us to change the lineweight of any line in the view, or set it to be invisible if we do not want to see it.
 The Split Face and the Paint tools allow us to split the surface of a wall and apply a different material to that portion of the wall.
These tools are great, but there is nothing built in the program to vary the lineweight automatically based on the depth of view. It would be nice for Revit to allow us to set some depth distances to automatically switch lines that are in the forground to be thick and the lines in the distance to be thin. Maybe some day we will have that.
Another tool that I find handy that few people know about is the Silhouette Edge setting. This setting will allow you to beef up the lineweight of the silhouette edge. This setting is found in the Advance Model Graphics Settings dialog box.

This should give you a head start on enhancing your elevations. You can still use the Linework tool with the Silhouette Edges turned on.
The Split Face and the Paint tools allow us to split the surface of a wall and apply a different material to that portion of the wall. These tools are great, but there is nothing built in the program to vary the lineweight automatically based on the depth of view. It would be nice for Revit to allow us to set some depth distances to automatically switch lines that are in the forground to be thick and the lines in the distance to be thin. Maybe some day we will have that.
Another tool that I find handy that few people know about is the Silhouette Edge setting. This setting will allow you to beef up the lineweight of the silhouette edge. This setting is found in the Advance Model Graphics Settings dialog box.
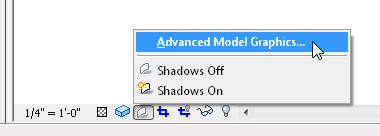 Inside the Advance Model Graphics Settings dialog box you can set the silhouette edges to any linetype you have in your project. This will automatically apply this linetype to the outside edges of your view.
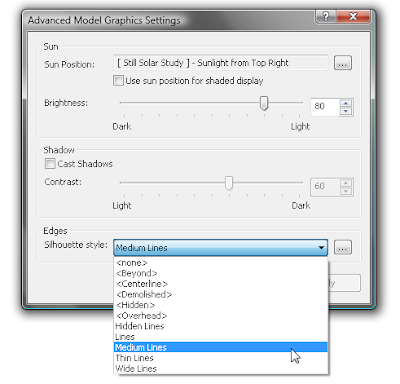
Here is a before and after view with the Silhouette Edges changed to Medium Lines.
Silhouette Edge set to None
 Silhouette Edges set to Medium
This should give you a head start on enhancing your elevations. You can still use the Linework tool with the Silhouette Edges turned on.
Monday, September 15, 2008
CADD Camp and AU
For those that are in the Alabama area, do not miss out on this year's CADD Camp in Birmingham on September 30!
We will be hosting a full day of training on Revit. I will also be presenting the basics of NavisWorks during lunch.
Check out the course offerings and sign up at:
http://www.augievents.com/Birmingham/tabid/432/language/en-US/Default.aspx.
This will be like a mini-one-day Autodesk University.
If you are fortunate enough to attend this year's Autodesk Unversity, check out the three classes that I will be presenting.
- AB110-6 AutoCAD® Architecture: Making Spaces Work For You!
- CV310-4 From Dirt to Doors: Making AutoCAD® Civil 3D® and Revit® Architecture Work Together In Harmony
- AB404-3 From the Existing to the Beyond with Revit® Design Options and Phases
These are both great opportunities, don't miss out!
Wednesday, May 07, 2008
Seek for Content
There is a new Autodesk website available to search for Revit Content.

Go to http://seek.autodesk.com/. You can search by keyword, browse by CSI format, and filter it down by manufacturer. It appears to pull from multiple websites. It is a one stop shop for all your content searches.
There is also a built in search line inside of the Revit 2009 products that will launch this site.
Wednesday, February 13, 2008
AutoCAD Architecture 2009
AutoCAD Architecture 2009 has some cool new features. I believe users will be excited to see the new enhancements. Here are a few of my favorites.
Wall Endcaps


Now AutoCAD Architecture 2009 makes it easier to create custom wall endcaps. While previous releases had this ability, enhancements to key “grip-edit” functionality makes the process more intuitive and streamlined.
Additionally, it’s easier than ever to modify endcaps using the “Auto-Calculate” feature and the integration of AEC Modify Tools.
Because of this, it’s now possible to extend, trim, and even merge wall components with AutoCAD linework, allowing you to create the endcap condition that you want… in fewer steps!
Match Properties Update

If you’re an AutoCAD user, you are probably aware of the Match Properties feature, commonly referred to as the “Paintbrush tool.”
Now, in AutoCAD Architecture, the “Paintbrush Tool” has been extended beyond AutoCAD entities to also work with AEC objects, such as walls, doors, and windows. The object matching paintbrush will allow users to match the style and graphic properties of one object to like objects in a drawing.
With this update, you’ll be able to quickly make design revisions to linework and objects, so that you don’t have to learn a separate set of revision commands!
Multiline Tags


Another feature around construction documentation is the ability to annotate with multi-line tags.
Now you can have more control over the way text appears in your construction documents by specifying text wrapping, rotation, and alignment in its tags with intuitive grips. With these tools, you’ll find it easier to communicate your design intent clearly.
These are just a few of the improvements. I believe the users will be happy with this release.
Tuesday, February 12, 2008
Welcome to Revit Architecture 2009
It's that time again! Time get excited about what the new features are in the up coming release of Autodesk products. My favorite time of the year!
Revit Architecture 2009 will be here soon. Inside of it will be new features and enhancements that will make your work easier. Here is a sneak peek at a couple of my favorite enhancements.
Dimension Enhancements

Revit Architecture 2009 makes documenting your designs even easier. With new dimension capabilities, users can dimension to intersections and arc centers. New dimension text formatting enables users to apply common text effects, such as bold, italics, and underline, to their dimension text.
A second new addition to dimensions is the ability to override dimensions with text. While this feature enables users to override dimensions with text such as “Varies, See Stair Plans” or “11” MIN” and thereby achieve new flexibility in their documents, the feature helps to maintain model integrity by disallowing user overrides that misrepresent actual dimensions. For example, users cannot make a 14’ 4” dimension read 14’ 6”.
Revision Enhancements
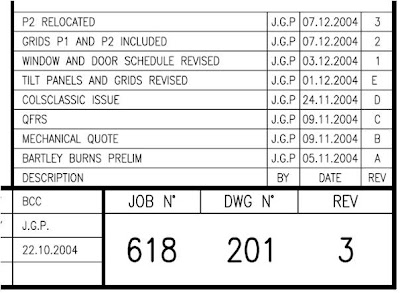
The new revision enhancements allow architects and designers achieve the various revision styles that they demand. New flexibility enables revision tables to build from the bottom up or top down. Also, numbering sequences can include and be sorted by numbers or letters. A new field called “Issued By” helps revision tracking.
New flexibility for revision layouts includes an ability to rotate the schedule on a sheet and to set revision schedules to fixed or variable size.
The added control and flexibility over revisions makes the differing standards in various regions around the world easy to meet.
Pretty cool! More to come soon.
Tuesday, January 29, 2008
Adjusting Door Swings
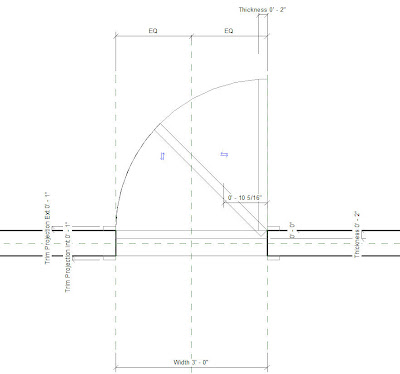
Revit comes with many types of doors that can be used in your projects. You can also download additional types from sites like Revit City and BIM World. Searching through these libraries, I relealized that none of them came with the ability to adjust the swing from 90 degrees to 45 degrees. This is a must in situations as shown below.
 Modifying the plan swing of doors is a simple process, as long as you understand a few things. You will need to open the door family that you want to modify by highlighting the door in your project and then picking the Edit Family button on the Options bar.

This will open up the door family in a Family Editor mode. You will then need to navigate Project Browser to open the floor plan view of the door.


Modifying the plan swing of doors is a simple process, as long as you understand a few things. You will need to open the door family that you want to modify by highlighting the door in your project and then picking the Edit Family button on the Options bar. This will open up the door family in a Family Editor mode. You will then need to navigate Project Browser to open the floor plan view of the door.
Revit uses Symbolic Lines to represent the swing and the door panel in plan views. The actual 3D door panel is not visible in the plan view because we typically want the door panel to be closed in a 3D view or elevation, and we want the door panel to be open in plan views.
To add additional swing angles, simply copy the existing door panel to the desired swing angle. I used the Rotate command with the Copy Option check so it would rotate and copy the panel in one step. Then you will need to copy the swing arc and trim it with the new door panel.
The thickness of the door panel is set to a thickness parameter that users can change. You will need to add a new dimension to the new door panel. Once this dimension is added, assign it to the thickness parameter by using the Label drop down bar on the Options bar.
The last step is to set the visibility parameters to allow one swing to be visible and the other swing to be hidden. To do this, you will need to highlight one panel and the corresponding swing arc. Once highlighted, go into the Properties and select the small box at the end of the Visible check box.
This will allow you to set the visibility to a parameter that users can control inside of their projects. Add a new parameter. Provide a name for the parameter that relates to the swing angle. Make the parameter an instant parameter so users can control this instantly as opposed to by type. Choose the group to place this parameter under. Repeat this process for the other door panel and swing arc. In the end, you should have one door panel and swing arc set to one visibility parameter, and the other door panel and swing arc set to another visibility parameter.
Load this door back into your project or save it to your library. Now when you select this door inside of your project, you will have the ability to check the box to show which swing you want to view. The end result is a plan that does not have doors swinging into each other.
Subscribe to:
Posts (Atom)