Search This Blog

Monday, October 04, 2010

Revit MEP Pipe Rise/Drop Symbols

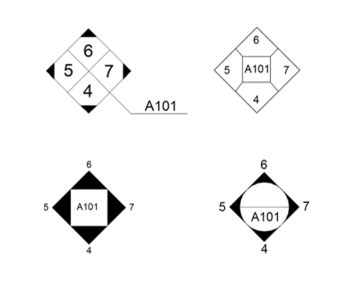
I recently had a support call asking about piping rise/drop symbols in Revit MEP. I thought I would share to help explain why Revit MEP shows a rise symbol versus the drop symbol.

First of all, users can change the desired symbol to be used in the Piping Setting dialog box. The defaults are set to a closed circle for rises and a 3/4 circle with a line for drops.


When drawing Pipe, Revit MEP looks at the View Range, the Level Heights, and the height of the pipe to know what to show. If the pipe is drawn between the bottom and the top of the view range, the pipe will show a drop symbol. If the pipe is drawn through the top range, the pipe will show a rise symbol.


You will need to verify what the height of the levels are and the height of the pipe, and then set your top range to be below the upper pipe to show the riser symbol.

A Plan Region can also be used to allow you to have a different View Range around a particular pipe.

Hope this helps clear up the rise versus drop debate.

Mike

Wednesday, September 22, 2010

Applied Software

I am excited to announce that as of 9/23/2010 I will be employeed at Applied Software. The move to Applied Software will enable me to continue to serve my customers in the TN, GA, AL, and MS regions as well as expanding my area to cover NC and SC. Applied Software has been providing solutions to the Commercial marketplace for more than 25 years.

Wednesday, September 08, 2010

AU Registration - Decisions, Decisions...

AU 2010 registration is open. Go get the good classes while you can!

I am all registered. It was difficult selecting my classes to attend. Three are a lot of great ones.

If you can not decide on a classes for the Wednesday 1:30 time slot, look for mine.

Friday, June 25, 2010

Here We Go Again... AU 2010!

Just got my acceptance email notifying me that I will be presenting once again at AU 2010! My proposal was one of 747 that were selected out of 3,100 proposals. Looking forward to AU 2010!

Look for registration to begin in late August, and of course look for my class.

Thursday, May 20, 2010

Monday, May 17, 2010

Using Filters to Hatch Duct in Revit MEP

I was asked today by one of my customers, "What is the easiest way to hatch duct work in Revit MEP to indicate which duct work has been installed on a project." There are several ways this could be accomplished. You could simply use the Filled Region to manually hatch the duct work. This is simple, but is tedious and time consuming.

Method 2 would be to use Phases inside of Revit MEP. You could set up some phases and change the graphics of the phases to indicate the hatching. This is easy enough, but almost an over kill.

The method I ended up recommending is to just use View Filters. You can simply create a new filter and change the graphics of the filter to have the hatch pattern.

I created a short video to share with my customer and thought it might be helpful for others.

Enjoy!

Wednesday, May 05, 2010

Friday, April 16, 2010

Release Day for Revit

You can now download the 2011 version of Revit from your subscription site. Get it while it is hot.

Also, don't forget to look at the Subscription Product Enhancements that are available to download.

Inside the Revit Extensions are a couple of new tools. One for converting parameters to Shared Parameters, and one to work with Land XML files on roads and bridges. I have not had a chance to play with either, but they sound promising.


Have Fun!

Monday, March 29, 2010

Revised #1 New Feature in Revit 2011

I know that I listed a tie between my favorite new features in Revit 2011, but I am bumping both of those for another new feature. This one is not that much of a 'wow factor,' but I think it will save time and make documenting your project so much easier.

What is this new found love?

It is the ability to locate tag placement while Tagging By Category. In previous releases, when tags were placed, you either could choose for it to draw a leader to the tag or accept the default location (which was usually right, smack in the middle of the item you were trying to tag). Then you had the tedious process of moving all the tags to a place where they were actually readable. With Revit 2011, when you choose to tag by category, Revit gives you the opportunity to move the tag right after placing the item, before picking the next item to tag. Revit does this without ending the command so you can continue placing tags on additional items.

I believe this will save time and allow users to place tags in the appropriate location so they are all readable. Even with this nice new feature, there is always room for improvement. It would have been nice for Revit to remember where you have place the tag in adjacency to the item being tagged, and automatically put the next tag in the same place for the next item. Oh well, maybe in 2012?

Below is a quick video showing how this works.

Thursday, March 25, 2010

Revit Architecture 2011 - My Favorite New Features!

Revit Architecture 2011 has many new features. Here are my favorite top 5 new features:

#5 - Sun Path Simulation
Autodesk Revit Architecture 2011 enables you to simulate the sun path, in order to better understand the impact of the sun in relation to your project and its surrounding context. The sun path is a visual representation of the sun's range of movement across the sky at the geographic location you specify for a project. The sun path displays in the context of your project and includes on-screen controls for positioning the sun at any point within its range of movement.
Along with this you can set the sun settings where changes have been made to how you select your project location. Included in the location dialog is a Google Map interface where you can search for your exact location.


#4 - Realistic View Style

Realistic is a shaded view with ‘live’ rendered materials and textures, including decals. It offers the ability to have a working view that looks almost like a rendering.

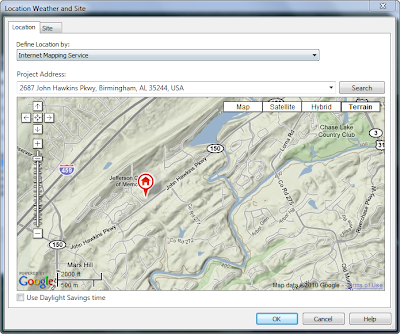
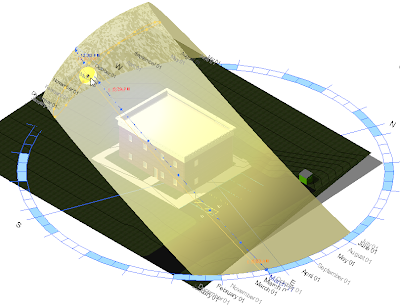
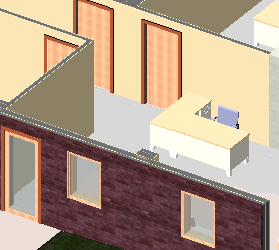
As part of the Graphic Display Options, Revit Architecture now offers an option to use Ambient Lighting (or Ambient Occlusion) in 3d views. Ambient occlusion approximates the way light radiates in real life, especially off what are normally considered non-reflective surfaces.


#3 - Sheet Place Holders

Sheets Lists can now include placeholder sheet rows for sheets that have not yet been created or will never be created in your project, for example, consultants’ sheets. Placeholder sheets can be converted to actual sheets in the project and this conversion can be done as a batch operation.

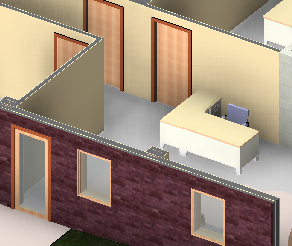
#2 - Temporary Dimension Improvements

You now have the ability to control temporary dimension font size and background display (transparent or opaque). Additionally, if temporary dimensions are moved to specific reference elements in the project, those references will be maintained throughout your working session.

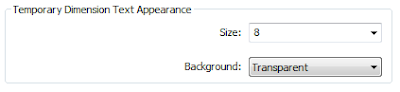
And the #1 new feature...


A TIE between Floating Properties Palette and Custom Elevation Tags!

The new Properties Palette is “modeless,” so you have constant access to both view and element properties, without having to interrupt your design workflow. The new palette is dockable, resizable and supports multiple monitor configurations.


Elevation tags are now fully customizable and can be designed based on your company standards. They can contain any graphics you want and can align to any number of orientations necessary for your project.